Copied – Cross Platform Clipboard

Copy On Your iPad, Paste On Your Mac

TranscriptPad (iOS only) is by far and away my favorite method of digesting depositions and other transcribed testimony. But, the heavy lifting often gets done on the Mac side.

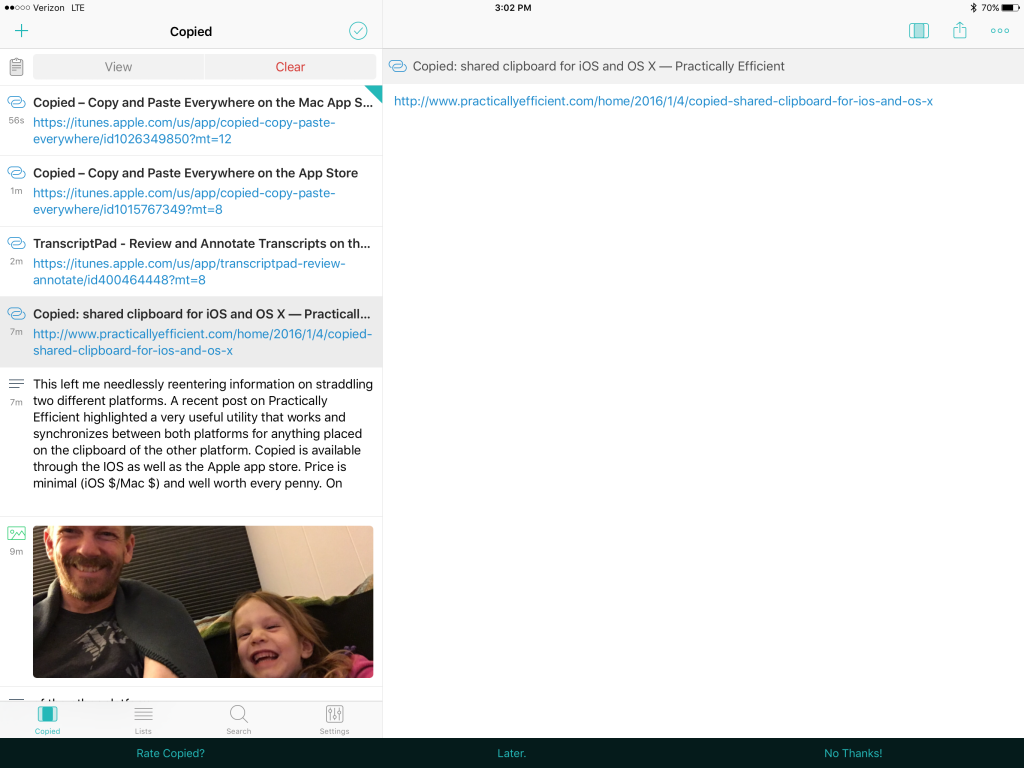
This left me needlessly reentering information, essentially straddling two different platforms. A recent post on Practically Efficient highlighted a very useful utility that works and synchronizes between both platforms for anything placed on the clipboard of the other platform. Copied is available through the IOS as well as the Apple app store. Price is minimal (iOS $1.99 upgrade/Mac $7.99) and well worth every penny. Once installed, anything placed on the clipboard of your iOS device synchronizes via iCloud and becomes Copied Clipboard Manager and Sync iOSimmediately available on any Mac running the software. Additionally, it works the other direction equally well. The utility also incorporates a clipboard manager that stores frequently used snippets of text and any other items that can be copied to the clipboard such as image files and URLs. On the iPad side, Copied includes utilities to transform text, e.g. convert text to upper/lower/title case; remove extra white space; and, find and replace. The ability to quickly format chunks of text on the iPad is particularly useful.

Reduce PDF for Court E-filings

Compressing or reducing PDF  document file size for e-filing with a court

E-filing documents saves a tremendous amount of time. But, getting file sizes right can be a huge headache. Our local e-filing (Utah) limits file size to about 7mb. Our local federal district court limits PDF file size to 10mb. Often times, a file that seems too large to upload as a single document can be compressed or reduced in size. PDF files now come from a variety of sources (clients, opposing counsel, online). We have no control over the settings when creating the original document. Cleaning up the pdf can often reduce the file size and allow filing without splitting up the document into multiple uploads. However, if you think you can compress a 452 page exhibit down to 10mb, you’re probably dreaming. File size remains a function of the analog document. Keep in mind that reducing below 150 dpi using any of these procedures may make small text virtually unreadable and may also effect the ability to convert to usable OCR.

Option #1 – Print and rescan the entire document and scan ‘good’ scan settings, i.e. 150 dpi. Of course, printing and re-scanning the document eliminates many of the efficiencies associated with using electronic versions of the file and wastes a tremendous amount of paper.

Option #2 – Use built in tools for Acrobat, Preview or PDF PenPro. In Preview, select file > export, then choose ‘Quartz Filter’ and ‘Reduce File Size’ from the drop down menus. Using Preview, you’re likely to get a reduction that makes small text difficult to read. PDF PenPro uses the same ‘filter’ as Preview, so you’re not going to get much mileage there. Acrobat has some very powerful file reduction features and granular control under the file > save as (from drop down choose Adobe PDF Files, Optimized). But, if there are any oddities in the document, you can end up with errors coming from who-knows-which-page. If you keep it simple and don’t muck around too much with the settings, you can get a good result. Pro-tip: Create a ‘temp’ folder on your desktop. Copy all exhibits to that folder. Create a batch process for reducing file size and run it on all exhibits after they have been put in the temp folder. Now you can visually see which of those files, even after reduction, is not going to pass the through the e-file size restrictions.

Option #3 – Use a ‘paid-for’ utility from the app store. Right now there are three paid utilities on the Mac App Store, PDF Squeezer ($3.99)(View in Mac App Store) allows you to create your own filter settings and has built in settings which work well, but no batch procession; PDF Compress Expert ($3.99)(View in Mac App Store) a little bit clunky interface with no option to rename documents, but does allow batch processing; PDF Compressor ($29.99)(View in Mac App Store) which also allegedly allows ‘batch processing,’ but is simply too expensive to purchase for review here.

Option #4 – Roll your own or DIY. The ‘paid for’ versions are, at bottom, doing something that any user can do using Automator or AppleScript. There are at least a couple articles out there that teach you how to create your own ‘filter’ on the Mac which will then be accessible in either PDF PenPro or Preview. If you are a hacky type, go roll your own.

For now, it does not appear that there is an easy way to accomplish PDF file size reduction using an iPad.

Siri, vCards and Private Me

Siri: Your Personal Assistant, But Maybe a Bit of a Blabber Mouth.

By now you probably know that you can tell Siri to “send a message to my wife” or “give me directions home” and she will do so. If not, she probably doesn’t yet know your wife or home address. So, tell Siri “My wife is [First Name] [Last Name].” The same, or similar, can be done for your home address.

Trouble begins when you go to share your business contact information by sending someone your vCard. Your contact card now also carries a whole bunch of info (home address, wife’s name, father’s name etc.) that you may not want to share with a professional colleague or client.

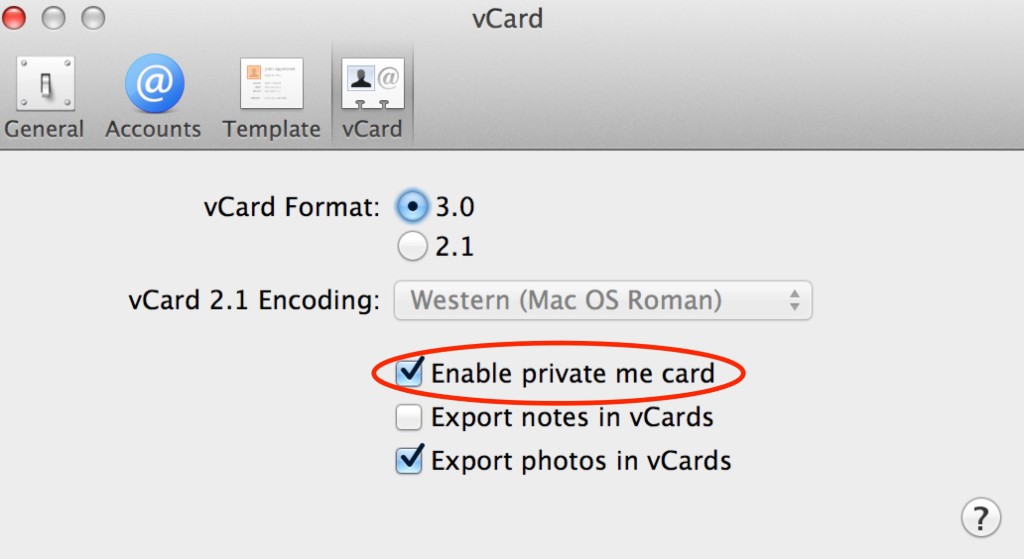
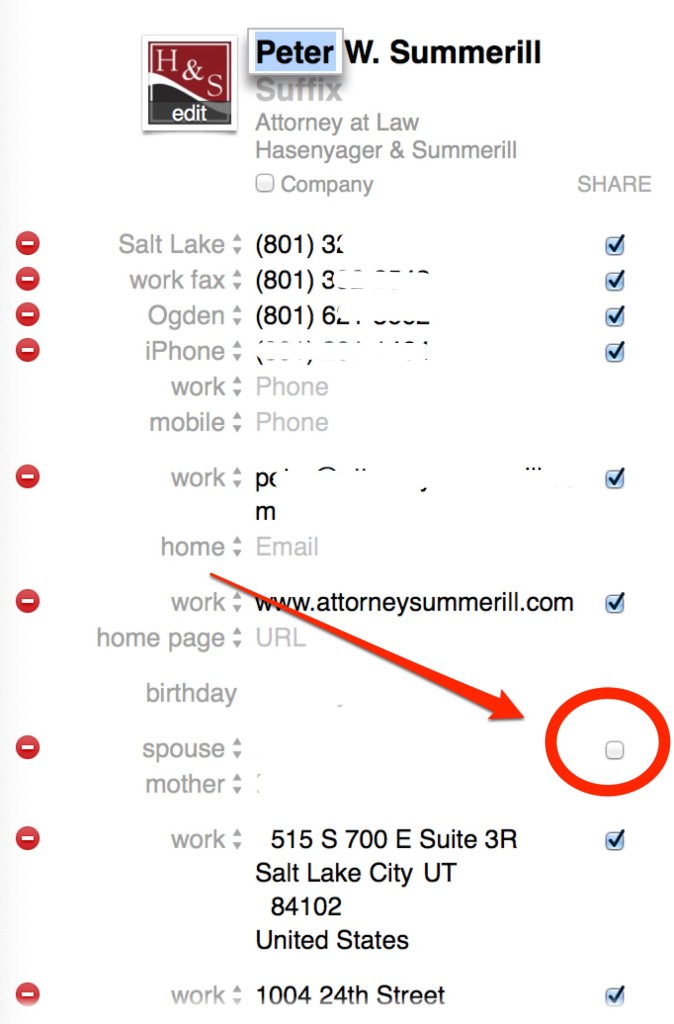
The solution lies in the Contacts app. Open up Contacts, Open Preferences and check the box that says “Enable private me card.” Now, open your personal card, click edit, and you can select the information you want to share or uncheck boxes next to information you wish to keep private.

vCard


Contacts

Mountain Lion – Dump iCloud as Default Save Location

One of the ‘features’ of Mountain Lion is that many apps (e.g. Preview, TextEdit and Pages) always default to save in iCloud. Annoying. Searching for a solution to correct this feature led to this tip on how to change Mountain Lion’s default save location on Mac OS X Hints. It’s a pretty simple fix, just open Terminal (type ‘Terminal’ in Spotlight) and cut-n-paste the following:

defaults write NSGlobalDomain NSDocumentSaveNewDocumentsToCloud -bool false

Then hit return, close Terminal, and restart your Mac. From there on out, you should no longer be defaulted to iCloud when saving documents. If you want to return to the default for iCloud, simply open terminal, cut-n-paste the following, hit return and when done, restart your Mac.

defaults write NSGlobalDomain NSDocumentSaveNewDocumentsToCloud -bool true

MacSparky – Paperless

20120511-165034.jpg

I didn’t want to write this. No, really, I didn’t want to write this. You see, other lawyers read this blog. Other lawyers are my competition. ‘Paperless’ by David Sparks makes it far too easy for other lawyers, a.k.a. my competition, to adopt a paperless system. Also, I’m quite jealous. David Sparks has written a book that I wish I could have written. Available, for now, in iBooks format only.

But, here’s the thing. The book is just so amazingly straightforward, awesome, and educational that I can’t help but pass it on. If you ever wondered how you could possibly go paperless, start here, look no further. David Sparks has written not only something that is beautiful to look at and read, but also entertaining and informative in a way that allows even the most entrenched Luddite to move forward with technology in their life. So, if you have an iPad and can spare the five bucks (come on you can spare five bucks) go pick up this book.

iPhone & iPad Wallpaper

MacSparky recently featured a link to some custom and subtle iPhone wallpaper. Some time ago I created a few custom backgrounds of my own and thought it’d be nice to share (1 iPad, 4 iPhone). Enjoy.

Google, Apple and MobileMe

Many, many, many people rely on Google not only for Gmail, but also for contact management, Gcal and Google Docs. Both Gcal and Gmail contacts sync very well with iPhones, iCal and Mac OS X’s Address Book. Gcal also offers the ability to painlessly share calendars in a workgroup, with a very low friction set up and virtually no administrative overhead. Similarly, if a workgroup so desired, they could also set up a centralized Address Book by requiring everyone to sync Address Book to a single Google account.

In the past, Apple users could simultaneously sync to MobileMe and to Google services. Products such as SpanningSync and BusyCal/BusySync as well as built in Google sync made it easy to play in both worlds.

Now, Apple has drawn a line in the sand by requiring the MobileMe user to designate their MobileMe account as the de facto dictator over calendar data. There are some work arounds, such as BusyCal’s setup. But that work around is difficult, error prone and not nearly as low friction as a plain vanilla Google to Google sync.

So, for those who used both MobileMe and Google services, and allowed others to edit calendar data via Gcal, a choice must be made: (1) move over entirely to Google services; (2) risk a difficult high friction and error prone work around; or, (3) force other users to adopt MobileMe at $99/year.

Given the sketchy work around, and potential loss of data through sharing, all of this is by way of an unfortunately long lead in for a product called SpanningBackup. From the developers of SpanningSync, SpanningBackup allows you to share your calendar and/or delegate email to staff or colleagues without worrying that they will delete or somehow otherwise bork your entire calendar/gmail/contact setup.

SpanningBackup does just what you might think: it backs up ALL of your Google data. All emails? Check. All contact data? Check. All calendars? Check. All Google documents? Check.

There are two drawbacks to SpanningBackup at this time. First, data is backed up only once per 24 hour period. Second, with the exception of Google Documents, discrete pieces of data cannot be restored. For example, SpanningBackup will restore a calendar to its earlier state for a previously backed up day. If a shared user somehow deleted your calendar data on Friday, you could then roll the calendar back to the previous state in place on Thursday. In this sense, SpanningBackup is more of a wholesale ‘revert’ than a back up and restore plan. SpanningBackup is cloud based and costs $39.95/year, a cheap price for peace of mind. If you are using Google Apps or just Google to share data, SpanningBackup is well worth a look.
Time Bandits

If you’re running the Pomodoro – Concentrate suggestion, you shouldn’t have too much trouble dodging the email time bandit.

But, macsparky is running a series on dealing with the e-mail intrusion and how to handle it. In the first part, he suggests checking email a limited number of times per day and turning off all instant notifications of new mail. Excellent advice.

Of course, limiting email exposure to a set number of times per day solves only one half of the equation. Once in your email, there are invariably links and, if you use web based email, even greater temptations to check the news, sports, gossip and on and on until your train is completely derailed. So, looking forward to following the series and seeing if he also gives up some tips on escaping the web of the world wide web.

3 Reasons to Join MILO

MILO is the Google Groups forum “Macs In Law Offices.” Recently, there have been three reallyMILO Logo great posts by users on that forum.

  1. You can tether an iPhone to your Mac for internet access over the 3G network without hacking or jailbreaking. MILO user Christian Frank pointed everyone to www.benm.at. But, there are better instructions at mydigitallife.
  2. MILO user Grace Suarez revealed a superb Firefox plug in called CiteGenie. If you’ve ever struggled with getting a properly quoted and cited copy/paste from Westlaw or Lexis into your document, this plugin eliminates hassle, allowing you to focus on the legal and analytical aspect of your work. CiteGenie truly represents the goal of getting computers to do the grunt work so you can focus on higher reasoning skills.
  3. You cannot tether an iPhone with the new 3.1 software update, as hinted at by MILO user Rob Ruffner and confirmed by comments in the mydigitallife how-to.

MILO is a great place to learn and ask questions, a superb resource for any Mac using lawyer.

TextExpander and Signatures

MacSparky posted a slick little trick on how to use TextExpander to insert just the link (no http:\www.blahblah.com) in the signature line.  Another nice trick with TextExpander is to use it to insert a signature, literally, into Pages, Word or Open Office documents.

Create Signature

Scan your signature and open in Adobe or Preview. Next, use OS X’s built in screen clipping (shift-command-4) key stroke to clip the signature. Open clipped signature in Preview. Once open in preview, click and hold the little arrow on the select toolbar icon. Choose ‘Instant Alpha.’

previewjhancock

Then, click and drag away the white portions around the signature. This step is necessary so that you aren’t pasting a white block/rectangle into your documents. By erasing the back ground, the text or signature line in the document will still show through the signature. Save the signature as a PNG file with the ‘alpha’ box checked.

Create a Snippet

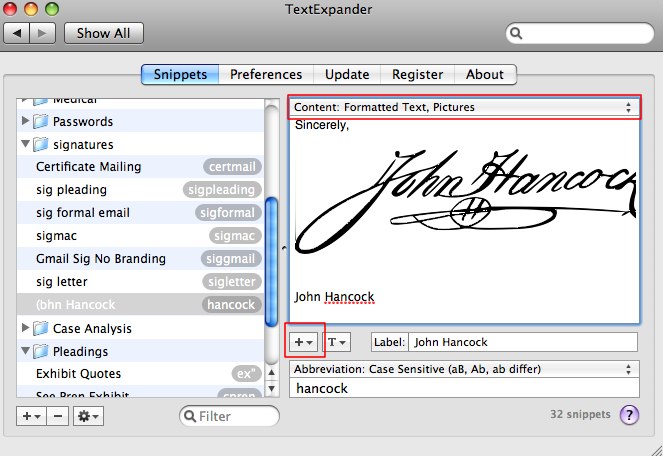
Open TextExpander and create a new snippet with Content: Formatted Text, Pictures from the dropdown.

textexpander-1

Click on the plus arrow and choose insert “Picture.” Choose the file you saved for the signature.

Now, whenever you type your shortcut, your signature will be dropped into the document.

untitled