Mountain Lion – Dump iCloud as Default Save Location

One of the ‘features’ of Mountain Lion is that many apps (e.g. Preview, TextEdit and Pages) always default to save in iCloud. Annoying. Searching for a solution to correct this feature led to this tip on how to change Mountain Lion’s default save location on Mac OS X Hints. It’s a pretty simple fix, just open Terminal (type ‘Terminal’ in Spotlight) and cut-n-paste the following:

defaults write NSGlobalDomain NSDocumentSaveNewDocumentsToCloud -bool false

Then hit return, close Terminal, and restart your Mac. From there on out, you should no longer be defaulted to iCloud when saving documents. If you want to return to the default for iCloud, simply open terminal, cut-n-paste the following, hit return and when done, restart your Mac.

defaults write NSGlobalDomain NSDocumentSaveNewDocumentsToCloud -bool true

3 Reasons to Join MILO

MILO is the Google Groups forum “Macs In Law Offices.” Recently, there have been three reallyMILO Logo great posts by users on that forum.

  1. You can tether an iPhone to your Mac for internet access over the 3G network without hacking or jailbreaking. MILO user Christian Frank pointed everyone to www.benm.at. But, there are better instructions at mydigitallife.
  2. MILO user Grace Suarez revealed a superb Firefox plug in called CiteGenie. If you’ve ever struggled with getting a properly quoted and cited copy/paste from Westlaw or Lexis into your document, this plugin eliminates hassle, allowing you to focus on the legal and analytical aspect of your work. CiteGenie truly represents the goal of getting computers to do the grunt work so you can focus on higher reasoning skills.
  3. You cannot tether an iPhone with the new 3.1 software update, as hinted at by MILO user Rob Ruffner and confirmed by comments in the mydigitallife how-to.

MILO is a great place to learn and ask questions, a superb resource for any Mac using lawyer.

Format A USB Drive

Mac OS X, despite being one of the most intuitive and user friendly OSes on the planet, adopts a very obtuse procedure when it comes to formatting a USB drive. Every single time you get a new USB drive it comes formatted in FAT32. Of course, Time Machine will only work on a drive formatted as Mac OS X. So, pop open Disk Utility, select the drive and hit the ‘Erase’ tab… only to find out Disk Utility refuses to erase a FAT32 drive. Grrr. Instead of the ‘Erase’ tab, select the ‘Partition’ tab in Disk Utility, click the drop down for ‘Volume Scheme’ and select ‘1 Partition.’ Name the disk in the box provided and, on the drop down format box, choose ‘Mac OS Extended (Journaled).’ Hit the apply button, and a pop-up appears warning you that you are about to erase the disk (finally!) hit continue and you are on your way.

Save a PDF as Black and White

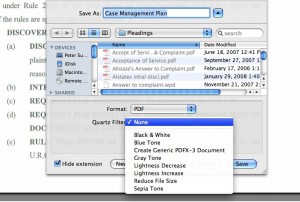
Not so long ago, the federal court clerk refused an efiling and requested it be refiled… the problem? The pleading had a scanned signature on it which showed up in nice blue ink and the federal efiling system required black and white. A quick attempt to save the document as black and white from Adobe Acrobat Pro failed, as did the attempt to print as black and white back to Acrobat Pro…. grrr. However, opening the document in Mac OS X’s built in Preview provided the solution… Save as gives the ability to save as black and white, even though the $300 Acrobat Pro refused to do so!

Killer iPhone Tip

Some time ago MacLitigator showed you how to use your iPhone for flash cards. Now, a genius in the blogosphere shows us how to use your iPhone to replace all those ‘club cards.’ In short, scan your membership card (local bar, federal bar, Costco, gym membership etc.) and save them as photos in iPhoto. Create a folder that syncs with your iPhone (call the folder ‘wallet’ or ‘wallet cards’) and automagically you get all your cards in one convenient location. And, best of all, the bar codes can be read and scanned. Of course, this technique can also be used as an alternative to MacLitigator’s technique of emailing yourself a set of evidence flash cards.

Wallet Cards on my iPhone via Lifehacker

OK, This One Is Mine.

Unless you are in trial ALOT (in which case you probably aren’t reading this), you may want a way to stay fresh on your evidence (objections, hearsay etc.). Or, maybe you just want to expand your Spanish vocabulary or brush up on those periodic tables… who knows. But, just as in school, one way to keep fresh can be to flip through a set of flash cards from time to time.

But, who can stand to carry several decks of flash cards around? Well, if you have an iPhone, you can stand it, and listen to some smooth tunes while you learn as well.

Evidence Flash Card AnswerEvidence Flash Card Q

Step 1: Either scan a set of flash cards (Fujitsu Scansnap or any business card scanner should do) or create a set in Pages/Word (if creating a custom set, be sure to set the paper size to no larger than 3X5 and landscape mode, not portrait).

Step 2: Email those suckers to any account which your iPhone uses.

Step 3: Open email on your iPhone, download the document, turn that iPhone sideways, and enjoy.

No more dropping, losing, or inadvertently shuffling up your flash cards. Plus, they all now fit in the slim slim iPhone.

One caveat… if you are using Adobe Acrobat Pro, you might want to avoid OCR’ing the document and/or saving it out under Preview. Some OCR’d flash cards refused to display properly on the iPhone, but once stripped of their text and saved from Preview worked just fine.

I can’t dream up every great tip….

and in fact seem to be more of a collector than an inventor. But I sure know a good tip when I see it. If you have an iPhone, you can create a work around to make your phone vibrate first, then ring second according to this tip from jkOnTheRun:

Customize a ringtone by adding a period of silence before the actual sound. Then load up up the custom ringtone on your iPhone. Now, make sure you set your iPhone to use the new ringtone and also to vibrate upon an incoming call. When you get dialed up, your iPhone should “play” the silenced part of your ringtone while vibrating.

via: Lifehacker