Open Office 3.0 Beta

Open Office 3.0 Beta is now available for Mac. It is of note because, previously, to run Open Office on the Mac required X11 plug-in and, frankly, felt too clunky, slow and buggy to use. Even though Open Office 3.0 is still in beta, it is an appreciable improvement over 2.x. Took it for a short spin and it does a really great job opening Wordperfect documents, with correct text rendering on-screen, something which AbiWord still can’t seem to get right.

If you’re tired of trudging through AbiWord to open those Wordperfect documents, give Open Office 3.0 beta a spin.

Case Analysis Using Journler

Adobe2Journler!

Need to summarize some depositions? Need to summarize/build a chronology of a huge medical chart? Often litigators face the daunting challenge of collecting chunks of discrete facts/information from a diverse set of documents, usually Adobe PDF files. If you are using Adobe Acrobat Pro, Journler can help with a little AppleScript. If you have never used AppleScripts before, don’t worry, it’s no big deal. But, to make this system/script combo effective, you really do need to either (1) save the script as an application; or, (2) use a launcher such as Butler or Quicksilver. If you use either Butler or Quicksilver already, then I am assuming you don’t need instruction on how to launch an AppleScript from within Butler/Quicksilver. So, for the remainder, this article assumes you are saving the AppleScript as an application.

The Script

Here’s the nut, the pivot, the basis on which you can quickly extract those golden nuggets from deposition transcripts, medical charts, long winded contracts or other voluminous discovery. The script will send to Journler either: (1) a new entry in Journler with a link back to the resource, document name, file path, a specific page number reference and all tags associated with the smart folder to which you are adding; or, (2) append the currently selected Journler entry with a new resource, document name, file path, a specific page number reference to the currently selected entry in Journler. Update: WordPress has been rendering the em-dashes to dashes and straight quotes to smart quotes… Script Editor and Applescript hate those. So, em-dashes are stripped from code below, but you will still need to use find and replace to change quotes or here is a downloadable text file (adobe2journlerv1) you can open, cut and paste.

tell application “Adobe Acrobat Professional”

activate
if (count of documents) is 0 then
beep
display dialog “No documents found.” buttons {“•”} default button 1 giving up after 3
return

end if
set Document_Name to name of active doc
set File_Path to file alias of active doc
set Page_Number to page number of PDF Window 1

end tell
tell application “System Events”
activate
set New_Or_Selected_Entry to the button returned of (display dialog “Would you like to create a new entry or add to the currently selected entry?” buttons {“New”, “Selected”})

end tell
if New_Or_Selected_Entry = “Selected” then
tell application “Journler”
activate
set Selected_Entry to (selected entries)
if Selected_Entry is {} then
display dialog “No Entry Selected!” with icon 0
else
if (count Selected_Entry) = 1 then
set the_Entry to item 1 of Selected_Entry

else
end if
end if
set Original_Text to rich text of the_Entry
set rich text of the_Entry to Original_Text & return & ” ****” & return & “Document Name: ” & (Document_Name as string) & return & “Page Number: ” & (Page_Number as string) & return
make new resource with properties {owner:the_Entry, type:media, original path:(File_Path as alias), aliased:true}
set the selected entries to {the_Entry}
end tell

else
tell application “Finder”
duplicate file File_Path to “Macintosh HD:Users:username:Documents:Journler:Journler Drop Box” with replacing
end tell
tell application “Journler”
activate
end tell
set the clipboard to ” ****” & return & “Document Name: ” & (Document_Name as string) & return & “Page Number: ” & (Page_Number as string) & return & “File Path: ” & (File_Path as string)
end if

If you’ve never worked with AppleScript, it probably looks like a lot of hooey. Don’t sweat it. All you need to do is copy all of the above, open up Script Editor, and paste the script into the main pane. Next, make the ‘path’ relative to your system. This means substituting your ‘username’ (in “Macintosh HD:Users:username:Documents:Journler:Journler Drop Box” see bold/underline/italics above in script) with your username. If your system is set up as most Mac defaults, you should only need to change the username. Finally, choose “Save As” name it Adobe2Journler choose file format as “Application” and save it to Applications>Utilities.

Reap the Benefits.

Now the fun part… you get to see this wonderous thing Journler, AppleScript & Adobe Acrobat Pro in action. Set up a smart folder in Journler and set conditions for it to require whatever tags, categories, or comments you want to use to sort your information. For example:

Now, with a smart folder set up, hit command/space and bring up spotlight. Type Adobe2Journler (or as much as necessary to pull up the Adobe2Journler application) hit return and it launches the application. A dialog comes up asking if you want to create a ‘new entry’ or use the currently ‘selected entry.’

Choosing ‘new entry’ will bring up a dialog which directs you to choose the smart folder you want to add the entry into. You can also add additional tags or categories at this point. Click complete import and, finally, edit the individual entry in Journler heart’s content

Because this is the first time for entering this resource on this ‘new entry’ you need to hit command-v to get the document path, file name & page number inserted into Journler. If you chose ‘selected entry’ you should already have an entry selected before launching Adobe2Journler and the document path, file name & page number references will be appended to that selected entry.

Sum Up.

Once Journler opens, edit the ‘created date’ to reflect whatever date your document review dictates. You can then add text or notes or copy and paste from an OCR’d Adobe document directly into the Journler entry. One method is to create a ‘new entry’ for each significant date you come across while doing document review, and then simply use ‘selected entry’ for appending information to that date. Of course, more complex cases may require that issues/people have their own separate dated entries.

For deposition summaries, dates are not so important. Get your transcripts in Adobe PDF format, then use Adobe2Journler to send the page reference to Journler for tagging, categorization or commentary. You can also copy and paste from your deposition transcript so that you can see the chunk of text right there in the entry.

Final Word.

This is my first attempt at scripting anything outside of tutorials, so it’s not perfect and the hope is that those with more sophisticate skills will pick it up and run with it. In other words, YMMV… but if you have any skills at scripting, any feedback, input and contribution is much appreciated.

Also, Adobe Acrobat Pro is an unfortunate, but necessary, evil. Apple has discontinued scripting capabilities for Preview.

Finally, a few caveats about using this script. All paths are relative, you need to adjust them and there are no warranties, express, implied or otherwise associated with this script. Also, you can only have one Adobe document open at a time while using Adobe2Journler… If you have more than one document open, you can get a file reference to something other than what you intend.

adobe2journlerv1

Journler… but not journaling.


Don’t Let The Name Fool You.

The name ‘Journler’ doesn’t do justice for what can be done with this software. Although originally designed as a journaling application, the scope of data which this little application can handle goes way beyond any mere journal keeping functions.  Journler blends and balances power, customization, flexibility and still retains a simplicity that makes it instantly accessible.  The remainder of this post (and a few more to follow) will address how to replace Casemap with Journler, the best thing you can do is download it and play with it.


Casemap Replaced, And Then Some.

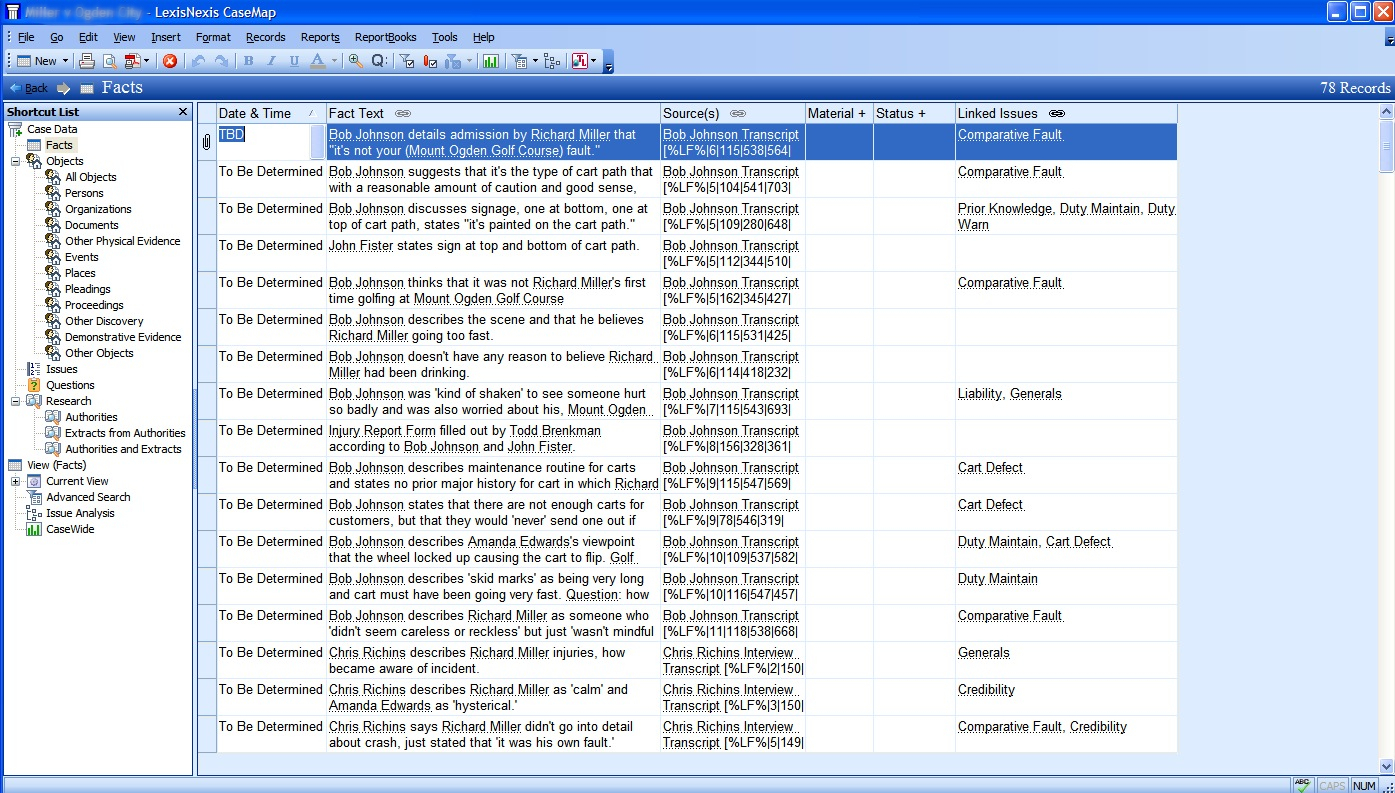
Casemap provides a dumping ground for case information, but a very structured and rigid dumping ground. In the center pane of Casemap, you get the ‘meat’ of your data in spreadsheet format. On the left, you can select different spreadsheets for Facts, Issues, Documents, People, Places, etc. Along the top bar, the most important aspect of Casemap is the ability to filter any of these spreadsheets by any of the other items, or even by a single search word.  So, for instance, you can filter your Fact Spreadsheet to display just those entries pertaining to the person “Joe Smith” and the document “Smoking Gun.”  


casemap.jpg 


Journler, by contrast, doesn’t come with a predefined left pane or, for that matter, structured data entry into spreadsheets. Casemap has a ‘box for everything’ and everything in its box approach.  In Journler, the top level on the left is labeled “Journal.” This is where everything goes…. literally everything.  Unlike Casemap, using Journaler does not require a separate file for each case.  You can literally dump everything into Journler through the day as you work. Now, in order to focus on a specific case, you create Smart Folders in that left pane. Smart Folders insist that an entry have particular text, tags, comments or categories.  What’s more, you can take any entry from the main Journal entry, drop it on a smart folder and (with the exception of generalized text) it will automatically inherit those tags, categories, or comments required to become a member of the Smart Folder. Smart Folders can be nested so that a sub-Smart Folder must have all the tags etc. associated with the parent was well as those defined for the sub-Folder.  What this means is that you can structure Smart Folders as seen on the left, and then use sub-Smart Folders to further filter down the entries.  Getting interesting, right?


bigpic.jpg


So, to mimic the Casemap functionality, simply create a Smart Folder with attributes that require the entry to contain the tag “Witness” or “Person” or whatever you want. Of course, start broadly, with a “Client” Smart Folder, then subfolders for each client, then subfolders within those to contain the specific data you want to filter on. You can create and destroy Smart Folders at a whim, without ever losing the entry itself. Which, brings us to the entry itself.


Unlike Casemap, all entries are listed in a center pane, but then directly below the entry you get the details of that entry, including the text, any jpgs, pdfs, tiffs, mp3s, web pages. On the far right, you can see the resources associated with the particular entry, clicking on the resource opens it immediately in the main pane. If the resource is associated with more than one entry, you can click the arrow next to it and it will list all other entries associated with that resource.  


Each entry can be associated with any number of Smart Folders, and can be cross-linked to any other entry. In fact, if you chose the entry name wisely, it will become an automatic WikiWord when entered into another entry and a link is automatically created back to the entry. So, for example, an entry titled Medical Emergency typed as MedicalEmergency creates the wiki link. In order to set up chronologies, use the ‘creation date’ box on the entry to give it the date you desire… in other words, ignore the creation date and use your own date when you want to create a historical chronology of entries that can be sorted by date. 


Finally, when a particular Smart Folder is selected on the left, only those entries associated with the Smart Folder will be searched and filtered. At the top right of Journler, you can begin typing and Journler begins filtering immediately all those entries which contain any of the text you are typing and it includes the text of resources which have readable text (pdfs, mainly). Further, the filter button next to the search box allows you to filter the entries based on a particular tag, comment, category or whatever.


The Benefits.

Journler saves all data in a non-proprietary text file and is fully Spotlight searchable. By using Journler, you have access to all your knowledge, on past cases, on research cases on other files, right at your finger tips without having to ever open another file to get there. Journler offers a tabbed interface, so you can look, compare, contrast and analyze to your heart’s delight, or until your spouse tells you it’s time to go to sleep. Journler is free for personal use… Yes, free. However, I highly encourage you to pay for it. The developer, Phil Dow, is literally building this software up on his own. A business license is only $34.95 and an incredible bargain. Plus, when 2.6 hits, it will be strictly pay software but you’ll get a free upgrade for having purchased early.


The Limitations.

At present, there are some shortcomings when compared to the Casemap suite. Most notably, an absence of transcript management and bates stamping.  There are some other little issues, but considering the benefits they mean literally nothing. As to the transcript management problem, stay tuned here as I will be posting an AppleScript in the near future that will make digesting any transcript (or any lengthy PDF) a breeze. As to the bates stamping issue, there is already lots of software out there that allows you to bates stamp PDFs, including Acrobat Pro for Mac. Also, and yet to come, will be a further exploration/explanation of the contextual click options, the Lexicon (woah, just play with it after you have a few hundred entries) and a way to tag without tagging, if that makes any sense.


A Final Word.

Go download Journler, play with it and play with it some more. Drop comments and suggestions here. Visit the Journler forums as they have a huge support base with eager users just waiting to help answer any questions. 

Rescue Me, Rescue Time?

rescuetime.jpg

Anybody, and I’m looking at myself the most critically, can find themselves getting sucked into the blackhole that is the internet, the WWW, the interwebs, the intertubes or whatever you want to call this giant time sink. It’s inevitable, and it’s why Google stock is worth so damn much. Humans follow their noses and those targeted links are the bullring in your nostril. Computers themselves, even devoid of the interwebs, offer tantalizing ways to waste your time… diddling around in iPhoto or finding an entire afternoon sacrificed at the altar of iTunes organizing and creating smart playlists. So, in steps a service/product called Rescue Time.

The product looks very promising… it doesn’t ‘block’ out websites or keep you from using certain software during designated hours.  Rather, it tracks every single application you use and every single website you spend time perusing. You can then go back and just look at what you didn’t accomplish and where you didn’t accomplish it. If sufficiently shocked and motivated to do something about the mess, you can tag these timesucks and start taking control over it all.timegraph.jpg
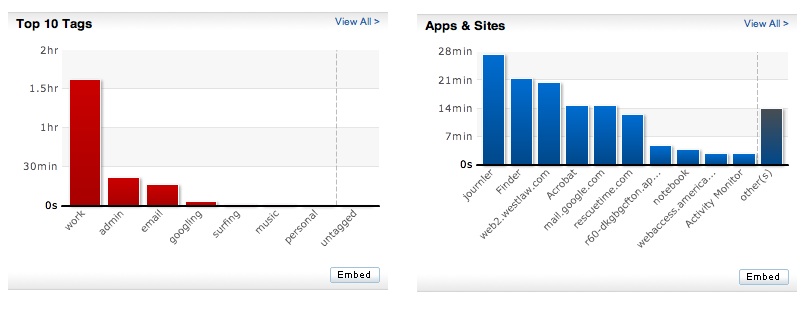
In the few short days in use here at MacLitigator, the results were astounding and will certainly alter workflow, focus and hopefully squash the incessant and heretofore unrealized need to repeatedly check email. Perhaps the best recommended method for using this software is to install and then forget about it for a few days. After 2-3 days, come back and you will see exactly where your weaknesses lie, and can then implement a plan to address those weaknesses. An added bonus for all you billable hour monkeys, you can go back and recreate information for timesheets.

Easy Envelopes, Really Easy.

Ambrosia Software makes a free widget called Easy Envelopes. I use this widget so often, I take it for granted and… that’s just the kinda stuff this blog was made to pass along.

 envelope.jpg

Easy Envelops is a Mac OS X widget that allows you to print an envelope, with a predefined return address or no return address. You can look an address up using Address Book from inside the widget, or you can cut and paste from where ever. Also, the widget fully supports fonts, colors etc. for a professional appearance. Once done addressing, click the postage stamp and a print dialog comes up asking you to choose your printer etc. I use this little widget all the time.  Ambrosia Software also makes the pay software WireTap Studio, a great application for sound capture and editing as well as SnapzProX, a screen capture utility for capturing full motion video of anything on your screen, a.k.a. screencasting. 

Reformatting Text

Every litigator (who does at least some of his or her own typing) should know the basics for copy and paste… “shift/alt/command v” to paste and match style vs. plain old “command v.” (FYI the ‘command’ key is the squiggle next to the space bar).But, even the paste special sometimes leaves you hanging, literally, with a whole bunch of bogus line endings, all caps, mixed caps or some other horrid text abomination. Devon Technologies did everyone a favor by putting together an OS X service which reformats text in a snap… WordService 2.7 is a free ‘service’ plug-in that takes away some pain.Devon’s WordServiceWordService CapsOf course, to make your favorite WordService quickly available without too much mousing around, you should map a keyboard shortcut to it in System Preferences>Keyboard & Mouse>Keyboard Shortcuts. So, really it’s a two-fer’ tip here… because you can map any menu item you want to a particular keyboard shortcut, not just services items.Sys Preferences Keyboard Mapping