Spotlight – The Advanced Course

Spotlight quickly finds folders, launches applications, jumps to contacts in address book all with a command-space keystroke and the first few letters of what you want to find/access.  But, Spotlight can go deeper too – filtering folders down to anything you desire based not only on search, but also metadata and through the use of boolean expressions.

Spotlight as a Filter

Spotlight can be accessed from both the command-space keystroke to search the whole hard driver, or through the search box on individual finder windows by hitting command-f (note: if done from a finder window, you must select folder from gray tool bar popup).  Either way, once searching, you can search for more than just text in a filename or inside a document.

In this example, the folder shows all files contained within the folder. In the next screen shot, the same folder has been filtered down to contain just those documents with the label ‘red.’ Finally, using the Spotlight search box, all files have been filtered down files created between 3/1/07 and 8/1/09 AND containing the word “discovery.”

Spotlight as Search Hound

A little language kung fu in your typical command-space search can also yield some great results.  For example, if you are looking for just a contact in address book: (1) hit command-space; (2) type “kind:contact smith” without quotes will bring up a list of all your address book contacts named smith. cursor down to the desired entry, hit return and address book opens.

Similarly, even tasks and events in iCal can be located. Command-space followed by “kind:event deposition” without quotes will call up all iCal events containing the word definition. Now, think about that for a moment. If you get in the habit of using a formal naming convention for events and tasks, you can instantaneously pull up a complete list of all events and tasks for a particular client-matter. Discipline yourself and staff to use Client – Event or Client – Task in the title for events and tasks and you can find them down the road through Spotlight and, of course, through your iCal search function as well.

You can download a complete list of Spotlight search operators from Mac OS X Hints. The Mac OS X Hints post contains an excerpt from David Pogue’s book, The Missing OS X manual which can give you an even more detailed look into how to make this work for you.

A Gripe and A Fix.

Part of the Apple experience comes from aesthetics. The hardware to the software all look so good and make interfacing with a computer a more human experience, less geeky and, I believe, makes work more enjoyable… of course a stable OS goes a long way too.

But, Apple (and many other manufacturers) miss the boat by not including a ‘Pointing Stick’ style mouse in their laptops. Years of use with IBM laptops (now Lenovo) convinced me the convenience of a Trackpoint or Pointing Stick on the keyboard outweighed the ugly. Moreover, after adapting to Apple’s trackpad only configuration, I have wrist pain in my right wrist from mousing. Switching to a lefty mouser helps, but probably only forestalls the inevitable, pain developing in the left wrist.

Although not a full-time solution, there are available desktop USB keyboards with built-in Pointing Sticks which a Macbook will recognize, so that while at a desk, an alternative and wrist relieving option exists.

Lenovo sells a full-size Ultra-Nav USB Keyboard that has both a Trackpoint and Trackpad option built in. Because it has a Windows key (shudder), you still get your command key for the Mac. The keyboard also has additional USB ports so your not going to lose a USB port by plugging it in. It costs a measly $99 and, as an added benefit, you get that beautiful IBM snap on the keyboard, a huge benefit for any touch typist. If you really want to kick it old school, PCkeyboard.com sells an old style IBM keyboard, the Endurapro, that actually uses springs underneath the keys. This is that old-school clickety-clackety sounding keyboard, but those springs and the tactile feedback are much missed by many typing pros, authors, writers and geeks. The Endurapro does not, however, have additional USB ports but does have that ugly retro welcome to 1991 feel that you just can’t find anywhere else. It retails for $99 as well.

Return from the Wild.

MacLitigator is back… early no less. No, it wasn’t the lack of internet or the inability to watch reality t.v. (ugh) that prompted an early return. Rather, the program which drew me into the wild just didn’t make a good fit with me personally. So, on to the tips regarding remote tech.

  • Prepare in advance. Let the important folks know you’ll be gone and leave forwarding phone numbers for emergencies.
  • Piggyback wireless wherever you can find it, and you can find it much easier with either macstumbler or kismac/istumbler/netstumbler.  Caution should be used as some view an using open wireless as pirating, while others view an open wireless connection as an invitation. 
  • For cell phone service, get up high, at the crest of a hill or on top of a butte.
  • Boost your cell phone signal with a booster antenna… I used Cell Ranger STIX available at www.repeaterstore.com for $129. Yes, it really works and works very well. However, with two cell phones running off the same repeater, sound quality did degrade somewhat.
  • Most importantly, relax. Much like a long running soap opera, the fast paced interwebs change microscopically in the big picture. Some RSS fees were up over 400 on my return. After bouncing through the first few entries, I realized that much of these little blurbs are, well, just blurbs and I missed nothing of consequence by my absence.

Format A USB Drive

Mac OS X, despite being one of the most intuitive and user friendly OSes on the planet, adopts a very obtuse procedure when it comes to formatting a USB drive. Every single time you get a new USB drive it comes formatted in FAT32. Of course, Time Machine will only work on a drive formatted as Mac OS X. So, pop open Disk Utility, select the drive and hit the ‘Erase’ tab… only to find out Disk Utility refuses to erase a FAT32 drive. Grrr. Instead of the ‘Erase’ tab, select the ‘Partition’ tab in Disk Utility, click the drop down for ‘Volume Scheme’ and select ‘1 Partition.’ Name the disk in the box provided and, on the drop down format box, choose ‘Mac OS Extended (Journaled).’ Hit the apply button, and a pop-up appears warning you that you are about to erase the disk (finally!) hit continue and you are on your way.

Save a PDF as Black and White

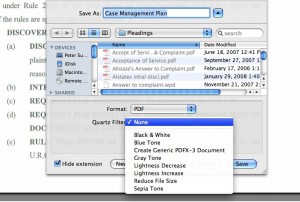
Not so long ago, the federal court clerk refused an efiling and requested it be refiled… the problem? The pleading had a scanned signature on it which showed up in nice blue ink and the federal efiling system required black and white. A quick attempt to save the document as black and white from Adobe Acrobat Pro failed, as did the attempt to print as black and white back to Acrobat Pro…. grrr. However, opening the document in Mac OS X’s built in Preview provided the solution… Save as gives the ability to save as black and white, even though the $300 Acrobat Pro refused to do so!

Jury Selection Spread Sheet.

The Mac Lawyer has a guest post article by G. Ware Cornell Jr about his jury selection spread sheet using iWork ’08’s Numbers program.  While it might not precisely fit your practice, just seeing the template created by Mr. Cornell provides a great jumping off point…. and the fact that Mr. Cornell created the template “in about ten minutes” should further give you the necessary inspiration.  Read the post and download the spreadsheet at The Mac Lawyer.

Killer iPhone Tip

Some time ago MacLitigator showed you how to use your iPhone for flash cards. Now, a genius in the blogosphere shows us how to use your iPhone to replace all those ‘club cards.’ In short, scan your membership card (local bar, federal bar, Costco, gym membership etc.) and save them as photos in iPhoto. Create a folder that syncs with your iPhone (call the folder ‘wallet’ or ‘wallet cards’) and automagically you get all your cards in one convenient location. And, best of all, the bar codes can be read and scanned. Of course, this technique can also be used as an alternative to MacLitigator’s technique of emailing yourself a set of evidence flash cards.

Wallet Cards on my iPhone via Lifehacker

Case Analysis Using Journler

Adobe2Journler!

Need to summarize some depositions? Need to summarize/build a chronology of a huge medical chart? Often litigators face the daunting challenge of collecting chunks of discrete facts/information from a diverse set of documents, usually Adobe PDF files. If you are using Adobe Acrobat Pro, Journler can help with a little AppleScript. If you have never used AppleScripts before, don’t worry, it’s no big deal. But, to make this system/script combo effective, you really do need to either (1) save the script as an application; or, (2) use a launcher such as Butler or Quicksilver. If you use either Butler or Quicksilver already, then I am assuming you don’t need instruction on how to launch an AppleScript from within Butler/Quicksilver. So, for the remainder, this article assumes you are saving the AppleScript as an application.

The Script

Here’s the nut, the pivot, the basis on which you can quickly extract those golden nuggets from deposition transcripts, medical charts, long winded contracts or other voluminous discovery. The script will send to Journler either: (1) a new entry in Journler with a link back to the resource, document name, file path, a specific page number reference and all tags associated with the smart folder to which you are adding; or, (2) append the currently selected Journler entry with a new resource, document name, file path, a specific page number reference to the currently selected entry in Journler. Update: WordPress has been rendering the em-dashes to dashes and straight quotes to smart quotes… Script Editor and Applescript hate those. So, em-dashes are stripped from code below, but you will still need to use find and replace to change quotes or here is a downloadable text file (adobe2journlerv1) you can open, cut and paste.

tell application “Adobe Acrobat Professional”

activate
if (count of documents) is 0 then
beep
display dialog “No documents found.” buttons {“•”} default button 1 giving up after 3
return

end if
set Document_Name to name of active doc
set File_Path to file alias of active doc
set Page_Number to page number of PDF Window 1

end tell
tell application “System Events”
activate
set New_Or_Selected_Entry to the button returned of (display dialog “Would you like to create a new entry or add to the currently selected entry?” buttons {“New”, “Selected”})

end tell
if New_Or_Selected_Entry = “Selected” then
tell application “Journler”
activate
set Selected_Entry to (selected entries)
if Selected_Entry is {} then
display dialog “No Entry Selected!” with icon 0
else
if (count Selected_Entry) = 1 then
set the_Entry to item 1 of Selected_Entry

else
end if
end if
set Original_Text to rich text of the_Entry
set rich text of the_Entry to Original_Text & return & ” ****” & return & “Document Name: ” & (Document_Name as string) & return & “Page Number: ” & (Page_Number as string) & return
make new resource with properties {owner:the_Entry, type:media, original path:(File_Path as alias), aliased:true}
set the selected entries to {the_Entry}
end tell

else
tell application “Finder”
duplicate file File_Path to “Macintosh HD:Users:username:Documents:Journler:Journler Drop Box” with replacing
end tell
tell application “Journler”
activate
end tell
set the clipboard to ” ****” & return & “Document Name: ” & (Document_Name as string) & return & “Page Number: ” & (Page_Number as string) & return & “File Path: ” & (File_Path as string)
end if

If you’ve never worked with AppleScript, it probably looks like a lot of hooey. Don’t sweat it. All you need to do is copy all of the above, open up Script Editor, and paste the script into the main pane. Next, make the ‘path’ relative to your system. This means substituting your ‘username’ (in “Macintosh HD:Users:username:Documents:Journler:Journler Drop Box” see bold/underline/italics above in script) with your username. If your system is set up as most Mac defaults, you should only need to change the username. Finally, choose “Save As” name it Adobe2Journler choose file format as “Application” and save it to Applications>Utilities.

Reap the Benefits.

Now the fun part… you get to see this wonderous thing Journler, AppleScript & Adobe Acrobat Pro in action. Set up a smart folder in Journler and set conditions for it to require whatever tags, categories, or comments you want to use to sort your information. For example:
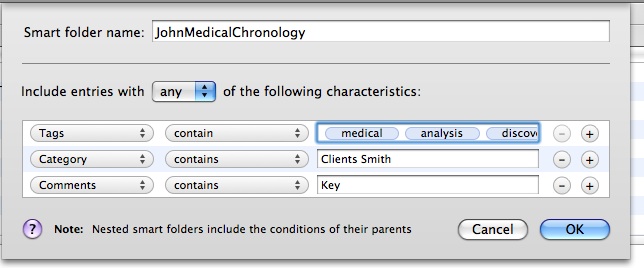
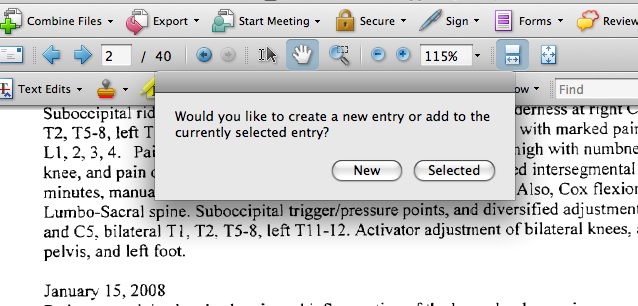
Now, with a smart folder set up, hit command/space and bring up spotlight. Type Adobe2Journler (or as much as necessary to pull up the Adobe2Journler application) hit return and it launches the application. A dialog comes up asking if you want to create a ‘new entry’ or use the currently ‘selected entry.’
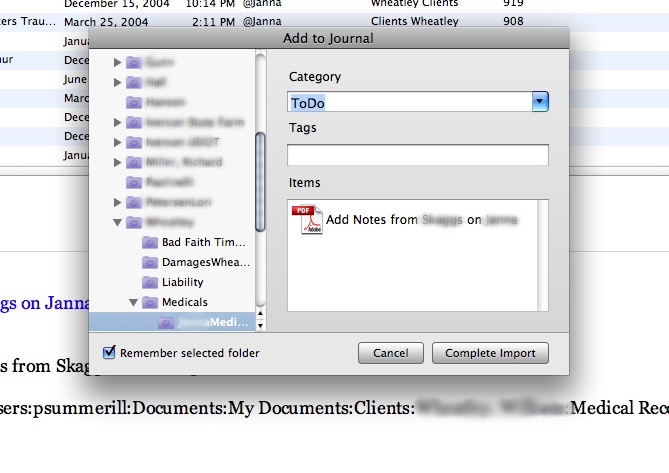
Choosing ‘new entry’ will bring up a dialog which directs you to choose the smart folder you want to add the entry into. You can also add additional tags or categories at this point. Click complete import and, finally, edit the individual entry in Journler heart’s content
Because this is the first time for entering this resource on this ‘new entry’ you need to hit command-v to get the document path, file name & page number inserted into Journler. If you chose ‘selected entry’ you should already have an entry selected before launching Adobe2Journler and the document path, file name & page number references will be appended to that selected entry.

Sum Up.

Once Journler opens, edit the ‘created date’ to reflect whatever date your document review dictates. You can then add text or notes or copy and paste from an OCR’d Adobe document directly into the Journler entry. One method is to create a ‘new entry’ for each significant date you come across while doing document review, and then simply use ‘selected entry’ for appending information to that date. Of course, more complex cases may require that issues/people have their own separate dated entries.

For deposition summaries, dates are not so important. Get your transcripts in Adobe PDF format, then use Adobe2Journler to send the page reference to Journler for tagging, categorization or commentary. You can also copy and paste from your deposition transcript so that you can see the chunk of text right there in the entry.

Final Word.

This is my first attempt at scripting anything outside of tutorials, so it’s not perfect and the hope is that those with more sophisticate skills will pick it up and run with it. In other words, YMMV… but if you have any skills at scripting, any feedback, input and contribution is much appreciated.

Also, Adobe Acrobat Pro is an unfortunate, but necessary, evil. Apple has discontinued scripting capabilities for Preview.

Finally, a few caveats about using this script. All paths are relative, you need to adjust them and there are no warranties, express, implied or otherwise associated with this script. Also, you can only have one Adobe document open at a time while using Adobe2Journler… If you have more than one document open, you can get a file reference to something other than what you intend.

adobe2journlerv1

OK, This One Is Mine.

Unless you are in trial ALOT (in which case you probably aren’t reading this), you may want a way to stay fresh on your evidence (objections, hearsay etc.). Or, maybe you just want to expand your Spanish vocabulary or brush up on those periodic tables… who knows. But, just as in school, one way to keep fresh can be to flip through a set of flash cards from time to time.

But, who can stand to carry several decks of flash cards around? Well, if you have an iPhone, you can stand it, and listen to some smooth tunes while you learn as well.

Evidence Flash Card AnswerEvidence Flash Card Q

Step 1: Either scan a set of flash cards (Fujitsu Scansnap or any business card scanner should do) or create a set in Pages/Word (if creating a custom set, be sure to set the paper size to no larger than 3X5 and landscape mode, not portrait).

Step 2: Email those suckers to any account which your iPhone uses.

Step 3: Open email on your iPhone, download the document, turn that iPhone sideways, and enjoy.

No more dropping, losing, or inadvertently shuffling up your flash cards. Plus, they all now fit in the slim slim iPhone.

One caveat… if you are using Adobe Acrobat Pro, you might want to avoid OCR’ing the document and/or saving it out under Preview. Some OCR’d flash cards refused to display properly on the iPhone, but once stripped of their text and saved from Preview worked just fine.

I can’t dream up every great tip….

and in fact seem to be more of a collector than an inventor. But I sure know a good tip when I see it. If you have an iPhone, you can create a work around to make your phone vibrate first, then ring second according to this tip from jkOnTheRun:

Customize a ringtone by adding a period of silence before the actual sound. Then load up up the custom ringtone on your iPhone. Now, make sure you set your iPhone to use the new ringtone and also to vibrate upon an incoming call. When you get dialed up, your iPhone should “play” the silenced part of your ringtone while vibrating.

via: Lifehacker