Airtable – Tab Set Up for Case Analysis

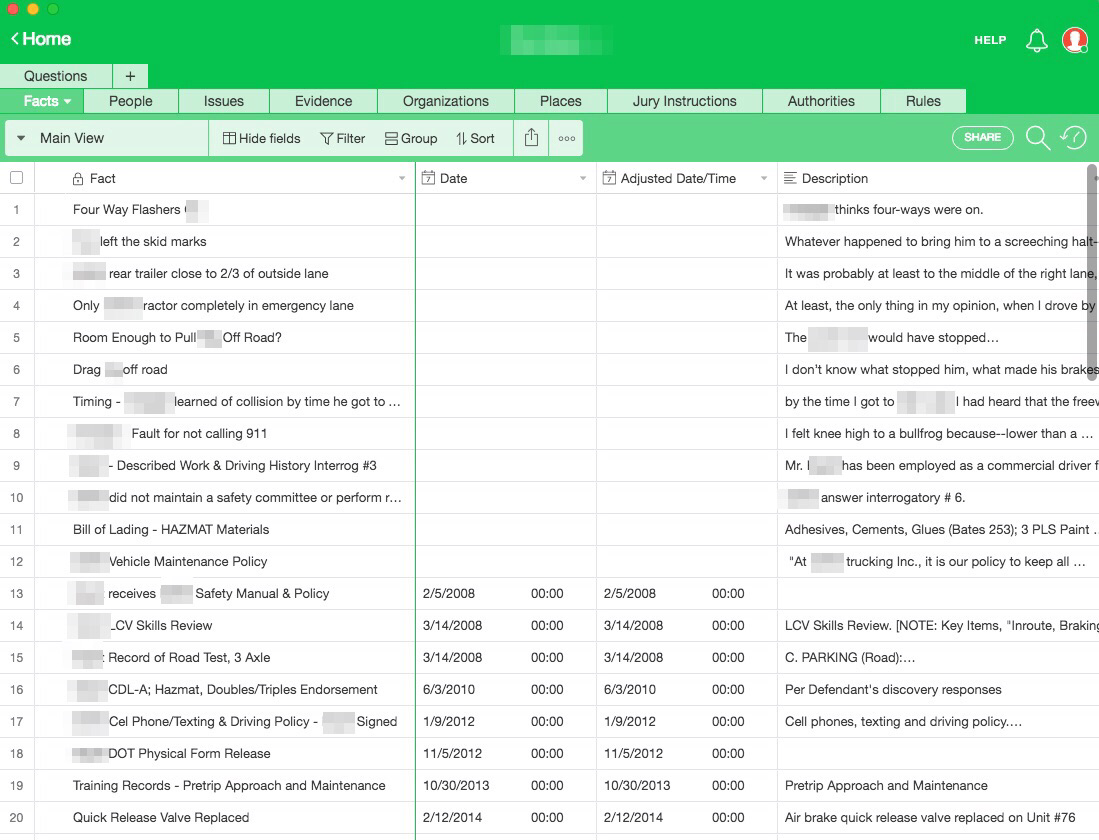
Airtable, previously reviewed and discussed here, makes a great online replacement for Casemap. After that last post, there have been several requests from folks for a screenshot of what tabs work well for conducting legal case analysis using Airtable. So, without further ado:Airtable Tabs Case Analysis

All of the tabs have Airtable Linked Fields for cross referencing information. For example, the facts view has a linked to the Jury Instructions table. By linking facts to individual jury instructions, you can get a quick summary of all facts supporting or opposing the particular legal issue. The great thing about Airtable is the flexibility. You’re not locked into somebody’s predetermined ideal about what case analysis should like for you. The flexibility/customization can be a bit daunting (a bit like looking at a blank page when you need to first start writing a brief). But, after playing around with Airtable for a bit, you can really begin to leverage this flexibility, get creative and start to make connections in your case. Also, it’s great for working with other team members or getting someone new to the case up to speed quickly. Really, the only beef I have with Airtable at this point is the lack of off-line accessibility.

Timestream Case Analysis Tool & Review

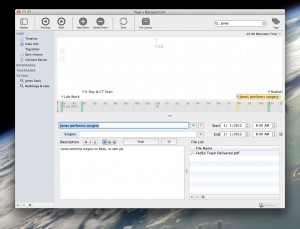
Case Analysis Using Timestream

Well designed and smooth interface. A nice approach to viewing cases from a chronological perspective and virtually no learning curve. Features a bit limited on the 1.0 release given for review and few quirks. Lawyers looking for a different view of their case facts might find a place for Timestream in their toolkit.

Getting Info Into Timestream

Putting events into Timestream is fairly straightforward, but with a few quirks. Events consist of date, time and description. Files can also be associated with an event via the Finder or drag and drop. Tags can be added to events. Tags are a bit quirky. If you have ever used a tagging system with software before (Evernote, DEVONthink etc.) you probably expect to be able to just start typing a tag in the Tags field and, if the tag already exists it will autocomplete. If the tag does not exist, hitting return will add a new tag once you finish typing the word. Timestream requires each tag to be entered using a mouse click on a “+” button and selecting the tag. This must be done for each tag added to an event.

Filtering & Searching Case Info

Searching can be done on the fly by selecting a tag, using word search across titles and descriptions or a combination of both. Searches on words can be single word, boolean and include at least rudimentary wild card support, e.g. surger* will return all results for surgery and surgeries. Saved searches can also be created using either or both, but with the added benefit that more than one tag at a time may be used for the search. Selection of more than one tag requires that ALL of those tags be present. I.E. it is an ‘and’ type search and cannot be changed to an either/or search for multiple tags. Searching only occurs on information entered in Timestream and does not extend to attached files, so it won’t search through any of the attached PDF text.

Case Analysis Mac Software Timestream

Summary

At this point, the software is well developed, does not seem buggy and provides a useful tool if you aren’t already doing case analysis in a manner that allows you to see your case facts chronologically. A few more features would be nice, including the ability to see events in a list or spreadsheet view as opposed to being stuck with the timeline view. It would also be good if the app searched the text inside attached files which contain searchable text. Additionally, import and export functions would be much appreciated and perhaps help with data entry as well. Finally, it would be great if all of your hard work could be shown in a ‘presentation’ view format or at least be exportable for use by other time lining software such as BeeDocs 3D Timeline. Although Timestream bills itself as capable of converting a timeline into a ‘multi-modal, multi-media presentation tool that runs in any web browser,’ that feature is not currently available in the testing program provided for review.

Timestream is cross-platform and there are plans for iOS apps as well. Pricing is not yet available.

Medical Chronologies in DEVONthink Pro

Over at MILO, members occasionally ask how/what/why one might use DEVONthink Pro for chronologies. Here’s a picture.

By the way, the screenshot was created and annotated using Skitch, a really awesome and free screen grab utility that works well with Evernote (and is owned by Evernote). Skitch is also available for, and equally awesome on, the iPad.

DEVONthink To Go Review, DEVONthink Pro On Sale

The DEVONthink To Go app for iPad has been out for a while now.  The app ‘syncs’ a selected set of data from any DEVONthink database over to iPad.  After testing for a week or so now, the app is less than useful. The worst part: after adding some entries to the ‘sync’ folder, text data goes missing.  Even if the app weren’t corrupting some of the data, it is still not ready for prime time.  Notably, only a partial set of meta-data (labels, tags, keywords etc.) is usable on the iPad app.  For example, tags will sync from the desktop DEVONthink but are not editable on the iPad app. Further, the iPad app does not allow adding tags. In short, DEVONthink To Go is at best a work in progress and the recommendation is to wait before purchase.

On the other hand DEVONthink Pro desktop still remains a very powerful tool and, right now, is a huge bargain at 50% off at MacUpdate. If you haven’t bought a copy, $39.98 is a really good opportunity.

DEVONthink To Go

A new update for DEVONthink Pro just released with…. support for syncing to an iPad or iPhone. The new product DEVONthink To Go uses a wireless sync function, allowing you to selectively pick which parts of any particular database get moved to your iPad/iPhone. It also appears that data can be brought back from the iPad to the main database on your Mac. This really does change everything. Work up your case analysis (as posted here) and then take the necessary parts (or all of it) with you to the deposition, hearing or meeting. The app for iPad/iPhone has not yet hit the app store, but should be coming soon and will cost $14.99, a paltry fee for the ability to take your case analysis data on the go.

Case Analysis Using Journler – The Alternative Approach

Response to using the Applescript for Case Analysis led to some, ummm, issues to say the least. Some people don’t like the Applescript solution because it requires a full license for Adobe Acrobat Pro, others just can’t get the script to load and work properly. So, this last week, the workflow for using Journler in case analysis underwent a hard look and, surprise, surprise… sometimes things get more complicated than they need to be. In short, the following workflow eliminates the need for either Applescript or a full license to Adobe Acrobat and creates a simpler more efficient workflow as well. This entry will also go into more detail about setting up Journler itself, since there has been some confusion on that topic as well.

Occam’s Razor – Cut the script & the cost of Adobe.

The problem: You have a bunch of PDF files (some large, some small) numbering the hundreds or thousands of pages and we both know that there are only few relevant pages in there. The goal is to extract the nuggets of information and gather them in a single place so that they can all be viewed together, including the ability to see them in chronological order as well as filtered by issue, witness etc.

Pre-case analysis document preparation: The first, but not entirely necessary step, should be to OCR the documents. The second, and in my view, necessary step, Bates stamp those documents in a meaningful way. A good start might be to choose the first two letters from the adverse party’s names as the prefix. So, e.g., Smith v. Jones becomes SMJO000001 as a base bates number. You can get a bates stamper here which limits ‘batch’ stamping to 10 files at time if unregistered but is otherwise free.

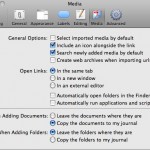
Pre-case analysis Journler set up: Journler Preferences>Media (Command-,) should be set up so that “When adding new documents: Copy the documents to my journal” is selected. This will ensure that the document will be copied into Journler, rather than an alias which might later get broken if the original file or folder gets moved. Journler Preferences>Advanced should be set to “Use drop box for fast imports.”

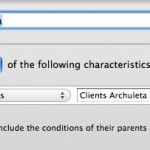
Smart folders should be set up in Journler which, at the very least, reflect the Client/Project Name on which you are working. Typically, I set up a main ‘client’ folder which requires that all items (and subfolders) have the Journler category “Client.” Then, each client gets their own smart folder which requires the client name in the in the Journler category field. You might also consider setting up a sub-folder under the client name to reflect a general category, such as ‘Medical,’ or whatever fits your purpose.

Case analysis: Open your PDF in Preview. When you get to that first ‘relevant’ document there are a number of options for getting it into Journler. If the page has OCR’d text, highlight the relevant text and hit Shift-Command-J. This will open a ‘new entry dialog’ pop-up for Journler. You can chose the ‘smart folder’ where you want to add a new entry and the entry will automatically be tagged and categorized per all requirements of the smart folder and the smart folder’s parent folders. In the example below, the new entry would be Categorized as “Client D__ R__” and tagged as “medical.” Downsides to this first approach include the need to have OCR text available on the page and the fact that the page/document itself does not get copied into Journler for later review. The second issue can be remedied by opening the side bar in Preview and literally dragging the image representing the page into the body of the Journler entry. The drag-n-drop method is nice because it mimics a typical law office workflow where relevant documents are picked out by an attorney and copied/added into a summary by a paralegal.

The second, and my preferred method, is that with the ‘relevant page’ in view, hit Command-c, then hit Command-n. This should open a new Preview window with the relevant page extracted and ready to be sent to Journler. Remember that the bates number is on there, and because Spotlight indexes those bates numbers, you can return to the document/page in its original context simply by typing the bates number into Spotlight. Now, to send this page to Journler hit Command-Shift-S to get the save dialog. Choose Desktop>Journler Drop Box. Doing so will bring up the same dialog as above, but now the page itself gets copied into Journler as a resource.

If you have more than one page, Preview will not allow you to create a ‘new’ document from multiple pages. The solution here is to hit Command-p (or print), choose the page range, then click on the “PDF” drop down in the print dialog and choose “Save to Journler.” This will import the full page range as a resource in a new Journler entry under the same dialog as above. Remember, to get the full print dialog allowing you to select individual pages, you need to click on the little blue down arrow next to the printer selection. Note that there are very few ‘clicks’ and most of the entry can be done using the keyboard, saving valuable time in mousing around.

Finally, and regardless of any of the above methods, hit ‘complete import’ and then switch to Journler. You can edit the “Created” date to reflect the actual date relevant to the entry, add tags, make notes in the body or whatever. You should also explore Journler’s powerful Lexicon feature (quite literally an index of every word in Journler and related entries) as well as Journler’s very powerful search and filter dialogs.

Obviously, this alternative approach is much simpler than the previous Applescript/Adobe Pro method and will work for any item that can be opened in Preview, including JPGs, TIFFS etc. However, since each of those items is often a single ‘page’ you might just want to drag and drop the item into Journler.

These methods readily grant the Mac using attorney the ability to not only replace Casemap, but to actually exceed Casemap’s analysis. Journler allows you to view multiple entries and cases at once, in multiple tabs. The full text search and free form approach also make it a breeze to customize your analysis well beyond the static limitations of Casemap. Because Journler encompasses all your cases, you are free to re-use information from other cases unlike Casemap’s one-case-at-a-time approach. Further, using Journler need not be the ‘overkill’ that some view consider Casemap to be. Because it can be as simple or deep as you need, Journler is a definite leap forward in case analysis as compared to Casemap.

Case Analysis Using Journler

Adobe2Journler!

Need to summarize some depositions? Need to summarize/build a chronology of a huge medical chart? Often litigators face the daunting challenge of collecting chunks of discrete facts/information from a diverse set of documents, usually Adobe PDF files. If you are using Adobe Acrobat Pro, Journler can help with a little AppleScript. If you have never used AppleScripts before, don’t worry, it’s no big deal. But, to make this system/script combo effective, you really do need to either (1) save the script as an application; or, (2) use a launcher such as Butler or Quicksilver. If you use either Butler or Quicksilver already, then I am assuming you don’t need instruction on how to launch an AppleScript from within Butler/Quicksilver. So, for the remainder, this article assumes you are saving the AppleScript as an application.

The Script

Here’s the nut, the pivot, the basis on which you can quickly extract those golden nuggets from deposition transcripts, medical charts, long winded contracts or other voluminous discovery. The script will send to Journler either: (1) a new entry in Journler with a link back to the resource, document name, file path, a specific page number reference and all tags associated with the smart folder to which you are adding; or, (2) append the currently selected Journler entry with a new resource, document name, file path, a specific page number reference to the currently selected entry in Journler. Update: WordPress has been rendering the em-dashes to dashes and straight quotes to smart quotes… Script Editor and Applescript hate those. So, em-dashes are stripped from code below, but you will still need to use find and replace to change quotes or here is a downloadable text file (adobe2journlerv1) you can open, cut and paste.

tell application “Adobe Acrobat Professional”

activate
if (count of documents) is 0 then
beep
display dialog “No documents found.” buttons {“•”} default button 1 giving up after 3
return

end if
set Document_Name to name of active doc
set File_Path to file alias of active doc
set Page_Number to page number of PDF Window 1

end tell
tell application “System Events”
activate
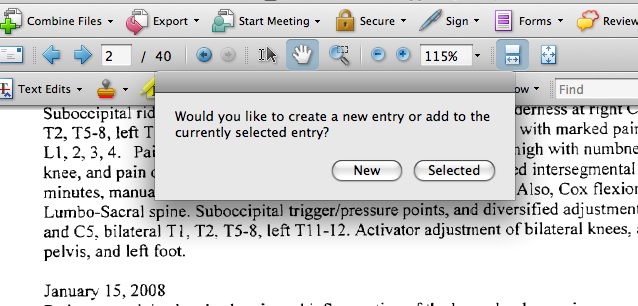
set New_Or_Selected_Entry to the button returned of (display dialog “Would you like to create a new entry or add to the currently selected entry?” buttons {“New”, “Selected”})

end tell
if New_Or_Selected_Entry = “Selected” then
tell application “Journler”
activate
set Selected_Entry to (selected entries)
if Selected_Entry is {} then
display dialog “No Entry Selected!” with icon 0
else
if (count Selected_Entry) = 1 then
set the_Entry to item 1 of Selected_Entry

else
end if
end if
set Original_Text to rich text of the_Entry
set rich text of the_Entry to Original_Text & return & ” ****” & return & “Document Name: ” & (Document_Name as string) & return & “Page Number: ” & (Page_Number as string) & return
make new resource with properties {owner:the_Entry, type:media, original path:(File_Path as alias), aliased:true}
set the selected entries to {the_Entry}
end tell

else
tell application “Finder”
duplicate file File_Path to “Macintosh HD:Users:username:Documents:Journler:Journler Drop Box” with replacing
end tell
tell application “Journler”
activate
end tell
set the clipboard to ” ****” & return & “Document Name: ” & (Document_Name as string) & return & “Page Number: ” & (Page_Number as string) & return & “File Path: ” & (File_Path as string)
end if

If you’ve never worked with AppleScript, it probably looks like a lot of hooey. Don’t sweat it. All you need to do is copy all of the above, open up Script Editor, and paste the script into the main pane. Next, make the ‘path’ relative to your system. This means substituting your ‘username’ (in “Macintosh HD:Users:username:Documents:Journler:Journler Drop Box” see bold/underline/italics above in script) with your username. If your system is set up as most Mac defaults, you should only need to change the username. Finally, choose “Save As” name it Adobe2Journler choose file format as “Application” and save it to Applications>Utilities.

Reap the Benefits.

Now the fun part… you get to see this wonderous thing Journler, AppleScript & Adobe Acrobat Pro in action. Set up a smart folder in Journler and set conditions for it to require whatever tags, categories, or comments you want to use to sort your information. For example:
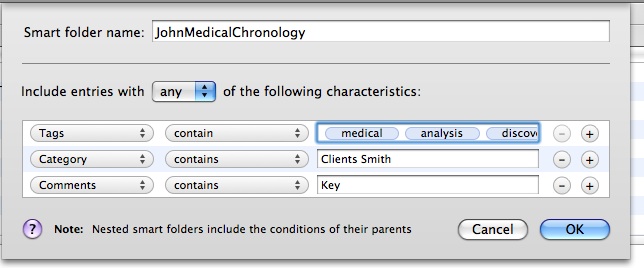
Now, with a smart folder set up, hit command/space and bring up spotlight. Type Adobe2Journler (or as much as necessary to pull up the Adobe2Journler application) hit return and it launches the application. A dialog comes up asking if you want to create a ‘new entry’ or use the currently ‘selected entry.’
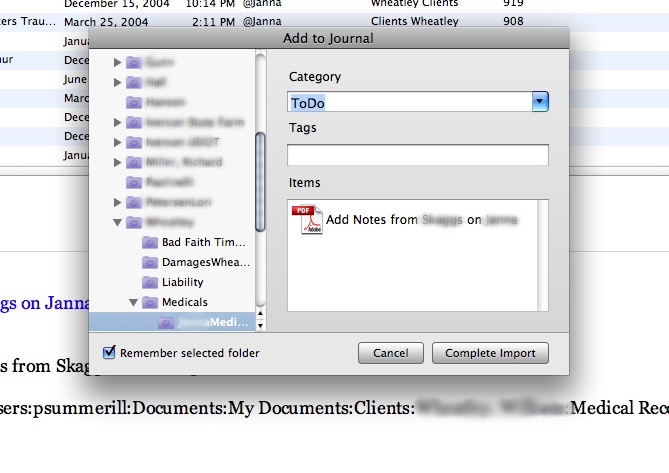
Choosing ‘new entry’ will bring up a dialog which directs you to choose the smart folder you want to add the entry into. You can also add additional tags or categories at this point. Click complete import and, finally, edit the individual entry in Journler heart’s content
Because this is the first time for entering this resource on this ‘new entry’ you need to hit command-v to get the document path, file name & page number inserted into Journler. If you chose ‘selected entry’ you should already have an entry selected before launching Adobe2Journler and the document path, file name & page number references will be appended to that selected entry.

Sum Up.

Once Journler opens, edit the ‘created date’ to reflect whatever date your document review dictates. You can then add text or notes or copy and paste from an OCR’d Adobe document directly into the Journler entry. One method is to create a ‘new entry’ for each significant date you come across while doing document review, and then simply use ‘selected entry’ for appending information to that date. Of course, more complex cases may require that issues/people have their own separate dated entries.

For deposition summaries, dates are not so important. Get your transcripts in Adobe PDF format, then use Adobe2Journler to send the page reference to Journler for tagging, categorization or commentary. You can also copy and paste from your deposition transcript so that you can see the chunk of text right there in the entry.

Final Word.

This is my first attempt at scripting anything outside of tutorials, so it’s not perfect and the hope is that those with more sophisticate skills will pick it up and run with it. In other words, YMMV… but if you have any skills at scripting, any feedback, input and contribution is much appreciated.

Also, Adobe Acrobat Pro is an unfortunate, but necessary, evil. Apple has discontinued scripting capabilities for Preview.

Finally, a few caveats about using this script. All paths are relative, you need to adjust them and there are no warranties, express, implied or otherwise associated with this script. Also, you can only have one Adobe document open at a time while using Adobe2Journler… If you have more than one document open, you can get a file reference to something other than what you intend.

adobe2journlerv1